|
We all know that the cost of remodeling any part of the home can be expensive. Most of us like remodeling to reflect our personality and maybe even try some of the new trends that are used today to update your home. But wouldn't it be great if you were able to get some of your homes improvement materials for free. Well look no further because if you have a truck or can find someone with a truck you can pick up as many of free pallets as you can load up. With these free pallets, you have many options to use these pallets with. Here are three home remodeling projects using free pallets that you can implement into your home. Decks/Front Porch Decks/Front Porch- If you're looking to add a new deck or porch to your home and you're on a strict budget than trying using pallets to deck out your deck or punch up your porch. There are many different ways to use the pallets by either taking them apart and using the boards as slats or you can take apart the top and bottom and rotate them in a different direction. Below is a sample picture of one of your options. You can get the step by step instruction of this picture on this website. http://www.goodshomedesign.com/diy-pallet-wood-front-porch/ 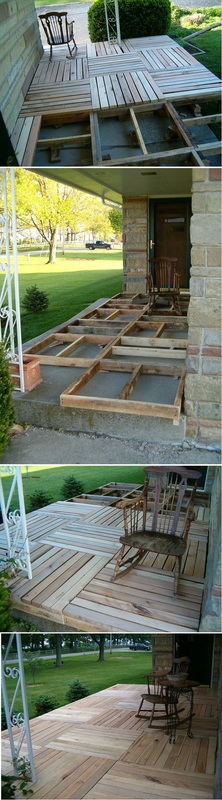 Wood Floors Wood floors- Now we all know that flooring can be really expensive especially hardwood floors so here is a great option for you to consider. If you are determined enough you should be able to cover most of your floors with free pallets. My suggestion is to scout out as many places and make a stockpile of these pallets before you start laying down your flooring. Now I will tell you this, taking pallets apart can prove to be challenging. There are a few videos that show you the best way to take them apart without ruining them or injuring yourself. This project will be labor intensive but if you are doing this yourself and you have the time this can save you a lot of money. Here is a picture of how your floors would look. If you would like to get instruction on this project click here to visit site If you want to know how to take the pallets apart go to this website. http://www.99pallets.com/pallet-projects/interior-floor-wit-pallets- inspiring-ideas/ 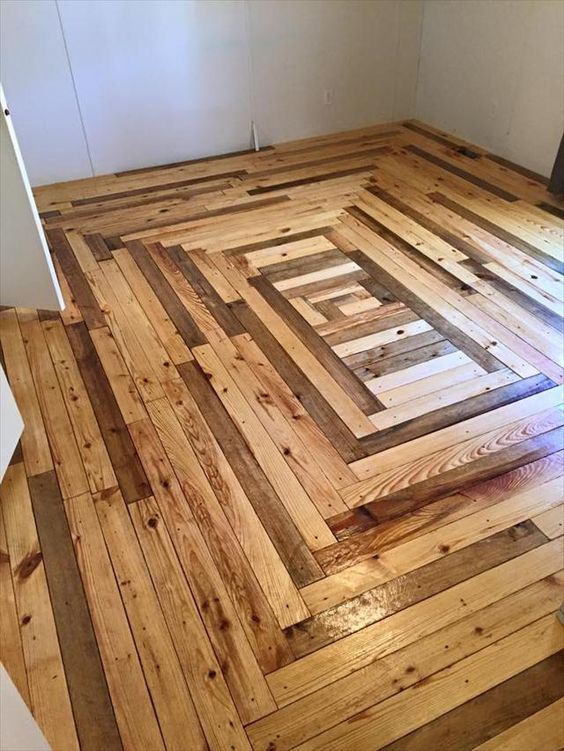 Wall Art/Pallet Wall Wall Art/Pallet Wall-I know that everyone has seen the wood on the walls and if you have seen shows where they go shopping for barn wood you will see that one piece can cost upwards to $1000 so can you imagine getting and entire wall cover in wood for the price of labor. You can distress that wood to your liking if that's the look that you're going for or you can just place it on your wall as is and stain it to the color of your choice. If you would like more instruction on how to attach these pallets to your wall without damaging your drywall click here! http://www.ana-white.com/2015/02/free_plans/pallet-wall-hgtv-saving-alaska 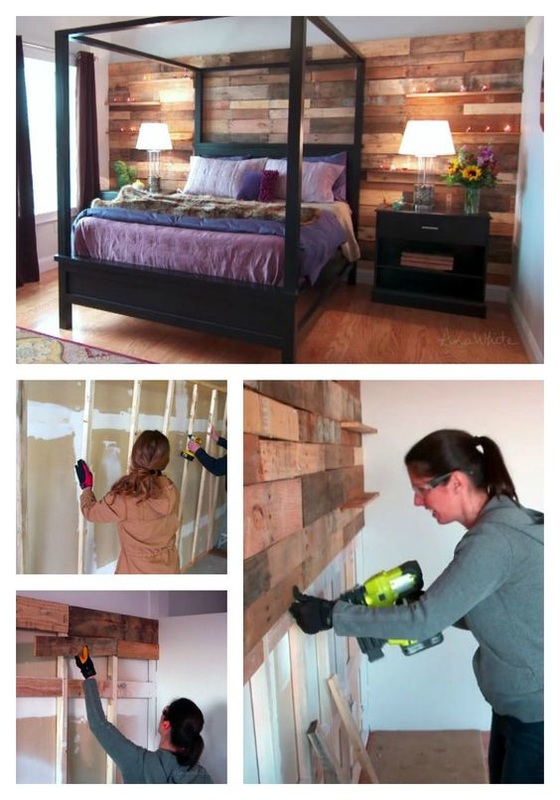 There are so many other remodeling projects using free pallets these were just a few to help you with your home improvement project. Do your research get creative and get moving on improving your home and saving yourself a little bit of money!
0 Comments
 On a budget, how to make a custom kitchen island for $250 The average portable island that you can purchase in stores cost around $499 up to $2,900 even Walmart have the nerve to charge $899 for a little one the size of a bottom kitchen cabinet. Not only is the cost outrageous but the style and size are totally unacceptable. Don't give up there are better alternatives to having an island to your specification and liking. That's right I'm talking about having an island for under $250 If you have an old dresser sitting in your garage or one in the home, here is your chance to re-purpose it for your kitchen island. If you need to purchase a dresser then you have several options. You can go to your local thrift store, consignment shop, garage sales and purchase it for about $65 to $75 dollars plus delivery. Another idea is to check on Craigslist for free items or you can place an ad stating that you're looking for a chest and how much you're willing to pay. I've done this before and received offers from some owners who just wanted to get rid of items if your willing to come pick it up. So do your research place to budget on the amount that you are willing to spend and stick to it. Now that you've got your island it's now time for its transformation. Sand your chest down so that the paint will adhere to it properly. I don't suggest staining the chest as it will take a lot amount of time to complete not to mention that it might not stain evenly. Add bead-board to the back part of the dresser to covers the hardboard in the back this should run about $20. To give it a little more architectural interest you can buy wooden posts for $60. Sand your chest down so that the paint will adhere to it properly. I don't suggest staining the chest as it will take a tremendous amount of time to complete not to mention that it might not stain evenly. After sanding, it's time to use a stain blocking primer that will help the paint to adhere to the piece properly and block any stains that are on the furniture. Once the stain is dry (read the time allowed to dry and be sure to paint on a dry day), it's time to paint. You have your choice of paint by choosing the color that you want or you can purchase a quart of oops paint for about $3. You can use a roller or a brush to paint your chest but I prefer to use a roller to avoid seeing any brush marks. Use a good quality roller because the cheaper ones leave fuzz on the surface. It's time to attach the island top to the surface. You can use granite, quartz or butcher block. Butcher block is the most economical and will cost you about $80 but if your heart is set on granite or quartz, you can go to the granite yard and search the remnants section and find a piece for little or nothing. There is no set price on these piece as they vary by state and type of stone you choose. Take the measurements to ensure you have the correct size and enough for overhang if you are doing a bar seating area. New hardware is optional be careful not to break the bank with hardware so if you are on a strict budget then I suggest that you spray paint the existing knob or pulls with a matte black finish after priming. But if you want to take your island to another level then buy the hardware that you love. If the dresser doesn't come to counter height this can easily be taken care of by buying wooden legs to raise the counter height or even adding a bottom shelf with legs would add more to the storage and height to the custom island. Here are a few pictures of dresser turned kitchen islands: 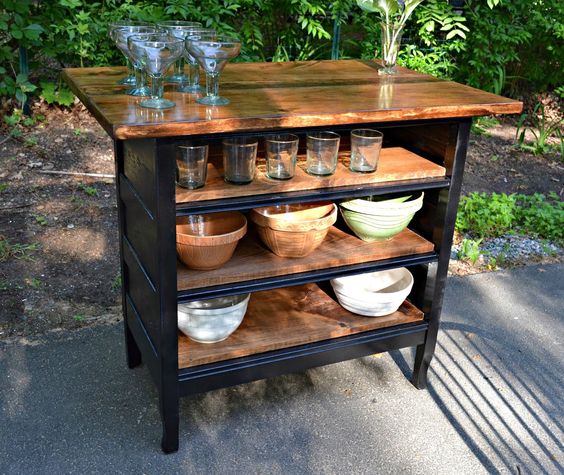 This black kitchen island was done for cheaper than $250. By removing the drawers it allowed for open storage for bigger items such as mixing bowls or large trays. All you would have to do to achieve this look is to have a piece of birch cut to the dimension of the inside of the chest. Secure each a piece of wood with wooden screws. You can also buy a piece of birch wood for the top have it stained and sealed and paint the chest to the color of your choosing. Now you have a piece to cut on, serve and store your everyday items. This idea would also be suitable for making a little bar in the corner of your living room. You can see this island at heirandspace.blogspot.com  This island is my favorite because it uses every surface on the outside of the island as usable storage or
function. Buy adding hooks to the side they created additional storage for their utensils and you now have a place to store paper towel when your cooking something messy. You can see this piece at ArchitectureArtDesigns You need to have at least 3' of space between your kitchen cabinets and the island. When you need that extra space and your on a budget making a kitchen island from a chest would be the better alternative.  Whether you're decorating your own personal bedroom or a kids room there is always a simple easy and inexpensive way to make it look like a professional designed it. Click here to learn the ins and out of this makeover
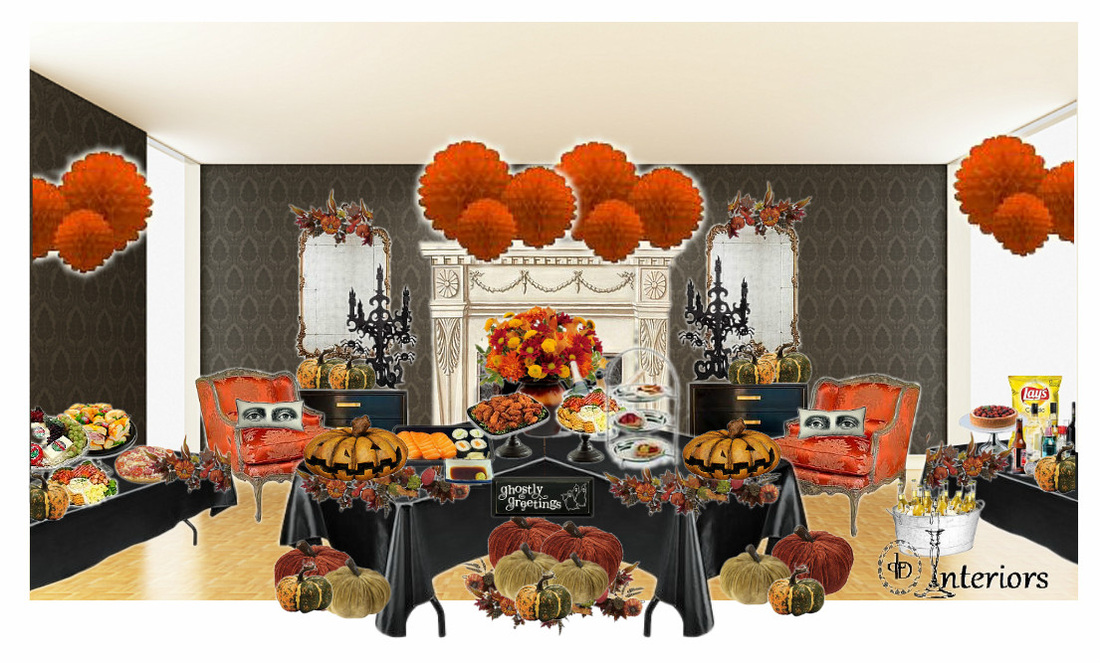
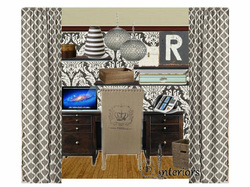 Lots of women dreams of having a huge closet and if your like me, I like shoes. With some of the newer homes that I have visited you are giving a little more closet space than you did back in the 80"s. But as you know it still isn't enough space for clothes, shoes and handbags. I suggest that if you have a separate room that you use as an office turn it into a combination closet home office. What's great about this idea is that you use the walls in the room for your closet storage and in the middle of the floor you would place a desk, office chair and two other chairs for guest. The other option is to use the closet in your spare room and turn it into an office space. Start by removing the wire system this is the time to paint or add wall paper if you choose. Go to your local home improvement store and buy per-cut shelving but make sure that you measure the inside of your closet. After paint or wall paper is cured add shelving to the closet and place your desk and chair in the office and add your accessories. If you have doors on your closet great you should be able to close that door at the end of the day. If your can't close the door because of your chair either remove the chair and place it on the side of the closet door, or remove the doors and add curtains.There you have it a place to do your business that you can close the door or curtain on.  Try and be as creative as possible. No need to call in professional closet organizers because it will cost anywhere from $2500 and up! You can basically use existing furniture that you have around your house and let your imagination run wild and before you know it you will have a combination closet home office.
 Here's a peak at whats inside theBasement Finishing University training program. I can't go over the entire program because it's really just too much to list. But before we get into all of this let me let you in on a little bit of history about the developer of this program his name is Eddie Case. Eddie works as a basement refinishing contractor full time for the past 17 years. Back in 2008 his company took a bit hit because of the economy. Things had gotten so bad for Eddie that he could no longer make ends meet. Because if this rough time he had to relieve 50% of his crew from their position. Things did not get any better and Eddie know that he needed to find an alternative way to earn income. So he began to wonder how could he use his skills to make much need income.
One day Eddie was sitting around with nothing to do and he was about to go stir crazy. So he decided to do a little surfing on the internet to see what type of information was available about refinishing a basement for home owners who wanted to do it themselves. It didn't take much time before Eddie realized that there wasn't much information available at least not any information that was of use to any one. He ran across a few sites with diagrams and pretty pictures which is pretty much useless especially if you don't know the first thing about refinishing anything. So he decided to upload some clips of him and his workers refinishing a basement. He created and new channel and before you know it within the first 30 days he had 250,000 views and over 500 new subscribers. Eddie was convinced that homeowners were indeed looking for this type of information because there really wasn't anything else out there. So Eddie decided to create a training course with step-by-step instruction on how to finish a basement from start to finish plus a few extra tips. Click Here to Get the Basement Finishing University Course With in 16 months the training program was born. The videos are very hands on not only are you getting instruction on what to do you are able to see the steps being done right before your eyes. You are literally looking over Eddie and his workers shoulders. The visual part of these video are so clear that if you didn't speak a lick of English all you have to do is watch closely and then repeat what they were doing. I guess you say it sounds to good to be true but why not. For example lets say that you didn't know how to hand sheet rock and you went to a friends home to watch him hang a few sheets presto you now know who to hang sheet rock. The only difference with this course is that you don't have to leave the comfort of your home and you don't have to go around looking for people to show you how to do every project pertaining to basement refinishing. You have the course right here in your hands and if you didn't get it you don't have to call and ask your friend to show you again all you have to do is rewind and keep it moving. I must say that Eddie though of everything when he designed this course not only will you get the videos instructing you on the projects but you will also be guided on what kind of materials to buy and from where. You will also know which tools are needed for each project. To make it simple it like have a cookbook video. It gives you the ingredients that are needed where you can purchase the ingredients when to use what and how long it will take to finish. Sounds pretty simple to me. So what can you expect to learn in Eddie's training course. You will began with how to identify obstacles in your basement and how to design around. Then you are shown how to add the new zones and finalize the design and floor plan. Next the training is laid out in Module form so that you know when you've completed one aspect of your project. Module 1 Basement Framing How to frame the basement how to lay walls on your concrete floor joists, wall plate layout, interior framing , exterior framing, half wall framing, ceiling and soffit framing , window and doors framing, closet, framing bathrooms and what materials and tools are needed to do the framing. This framing training is intense and very well laid out you won't find anything else like this out there. Then you will learn about the plumbing for your basement bathroom and laundry room. How to install the drain for your hot and cold water supply and how to install your water shutoff supply line and how to tie them into your home's existing water supply. Module 2 Basement Plumbing-This will come in handy if you plan on installing a bar, bathroom or laundry room in your basement. You will began with how to open concrete floors for drain lines. You will learn how to install drain lines, hot and cold water supply and how to install your water shutoff supply line, supply lines, water supply tie-in methods, waste line tie-in methods, sewage ejector installation A to Z, vent line installations and bathroom fixtures for your sink or shower and tub and vanity. And of course what materials and tools your going to need to complete the project. Click Here to Get the Basement Finishing University Course Module 3 Basement Electric You will learn how to rough wire all your new outlets, recessed light fixtures, and wire all switches. You will then being on installing outlets (regular & G.F.I.), switches (single pole, 3-way). Install all types “home runs” to panel box and how to install new breakers in panel box. Of course you will also have the information on what tools and material to purchase. You know how important it is to have your electric work done correctly that part proves to be invaluable. Module 4 Basement Heating and Cooling..... In this module you will want to have central air and heat. You will learn how to install hot and cold air feeds, central returns air trunks. How to tap into home existing feed lines, homes existing return system and how to install feed and return registers. And of course what tools you will need to get this job done. Module 5 Drywall (hanging and finishing) This module is where everything starts coming into place. You will learn how to hand drywall in your ceiling and walls. How to install corner bead and tape drywall seams and the inside corners. How to finish your drywall and how to sand the drywall and of course materials and tools needed for this project. Click Here to Get the Basement Finishing University Course Module 6 Basement Trim Training In this module you will start out with the basic trim work and then move on to more advance work. You will learn how to install base trim, window and door casting, interior doors , and stairway banisters. And how ti install handrail, trim for exterior doors, and window trim. Then Eddie give your hands on training of how to do customer built-in's like bookcases, shadowbox, and entertainment walls. Again detail will be provided on the type of tools and material you will need. This is only the training inside the building section of basement finishing university. There is over 27 videos with over 35 hours of training. Next is the Basement Foundation You will have a basement finishing mind-map design to keep you on course and on track with budget and deadline. Then you have your project completion stages guide training this is all done on a white board this section walks you through your training and keeps you from making costly mistakes the can cost you both time and money. Next is your Designing Basement Segment this is over 6 hours of design creations videos to help you inside this vault. You will get 5 powerful design tools inside and they are broken down into different section Steps for a Perfect Design
Next is the Obstacle Training course will teach you how to design round:
Then comes your Basement Design Roadblocks
Then comes the Design Idea Photo section you will receive 200 HD Photos in 16 categories Basement Design Software Tutorial
These are all the tools that you area going to need so that you feel confident with your work. And of course don't forget the bonuses! Eddie case is a basement remodeling specialist and has been remodeling basement for the last 17 year. If you would like to get more information about Eddie Case Basement Finishing University click on the link below to get started; Click Here! Disclaimer:I used affiliate links on this post and may receive a commission if you purchase a product To get the Basement Finishing University Course Click Here! Disclaimer:I used affiliate links on this post and may receive a commission if you purchase a product  Eddie Case is a basement remodeling specialist and has been remodeling basement for the last 17 year. |
AuthorHi Sandra here,  Archives
June 2016
Categories
All
|


 RSS Feed
