 On a budget, how to make a custom kitchen island for $250 The average portable island that you can purchase in stores cost around $499 up to $2,900 even Walmart have the nerve to charge $899 for a little one the size of a bottom kitchen cabinet. Not only is the cost outrageous but the style and size are totally unacceptable. Don't give up there are better alternatives to having an island to your specification and liking. That's right I'm talking about having an island for under $250 If you have an old dresser sitting in your garage or one in the home, here is your chance to re-purpose it for your kitchen island. If you need to purchase a dresser then you have several options. You can go to your local thrift store, consignment shop, garage sales and purchase it for about $65 to $75 dollars plus delivery. Another idea is to check on Craigslist for free items or you can place an ad stating that you're looking for a chest and how much you're willing to pay. I've done this before and received offers from some owners who just wanted to get rid of items if your willing to come pick it up. So do your research place to budget on the amount that you are willing to spend and stick to it. Now that you've got your island it's now time for its transformation. Sand your chest down so that the paint will adhere to it properly. I don't suggest staining the chest as it will take a lot amount of time to complete not to mention that it might not stain evenly. Add bead-board to the back part of the dresser to covers the hardboard in the back this should run about $20. To give it a little more architectural interest you can buy wooden posts for $60. Sand your chest down so that the paint will adhere to it properly. I don't suggest staining the chest as it will take a tremendous amount of time to complete not to mention that it might not stain evenly. After sanding, it's time to use a stain blocking primer that will help the paint to adhere to the piece properly and block any stains that are on the furniture. Once the stain is dry (read the time allowed to dry and be sure to paint on a dry day), it's time to paint. You have your choice of paint by choosing the color that you want or you can purchase a quart of oops paint for about $3. You can use a roller or a brush to paint your chest but I prefer to use a roller to avoid seeing any brush marks. Use a good quality roller because the cheaper ones leave fuzz on the surface. It's time to attach the island top to the surface. You can use granite, quartz or butcher block. Butcher block is the most economical and will cost you about $80 but if your heart is set on granite or quartz, you can go to the granite yard and search the remnants section and find a piece for little or nothing. There is no set price on these piece as they vary by state and type of stone you choose. Take the measurements to ensure you have the correct size and enough for overhang if you are doing a bar seating area. New hardware is optional be careful not to break the bank with hardware so if you are on a strict budget then I suggest that you spray paint the existing knob or pulls with a matte black finish after priming. But if you want to take your island to another level then buy the hardware that you love. If the dresser doesn't come to counter height this can easily be taken care of by buying wooden legs to raise the counter height or even adding a bottom shelf with legs would add more to the storage and height to the custom island. Here are a few pictures of dresser turned kitchen islands: 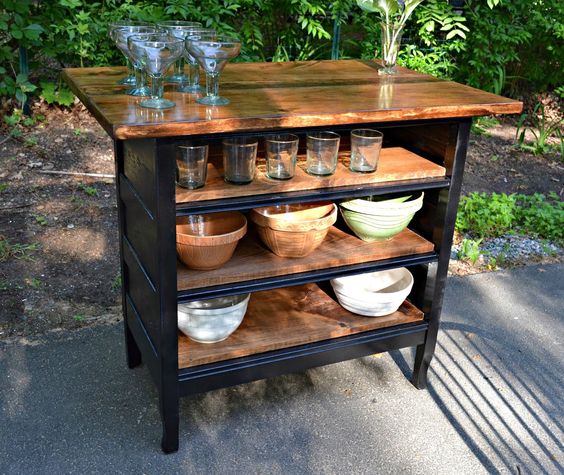 This black kitchen island was done for cheaper than $250. By removing the drawers it allowed for open storage for bigger items such as mixing bowls or large trays. All you would have to do to achieve this look is to have a piece of birch cut to the dimension of the inside of the chest. Secure each a piece of wood with wooden screws. You can also buy a piece of birch wood for the top have it stained and sealed and paint the chest to the color of your choosing. Now you have a piece to cut on, serve and store your everyday items. This idea would also be suitable for making a little bar in the corner of your living room. You can see this island at heirandspace.blogspot.com  This island is my favorite because it uses every surface on the outside of the island as usable storage or
function. Buy adding hooks to the side they created additional storage for their utensils and you now have a place to store paper towel when your cooking something messy. You can see this piece at ArchitectureArtDesigns You need to have at least 3' of space between your kitchen cabinets and the island. When you need that extra space and your on a budget making a kitchen island from a chest would be the better alternative.
0 Comments
|
AuthorHi Sandra here,  Archives
June 2016
Categories
All
|
 RSS Feed
